
Sunday, 30 October 2011
Robot Arm
Here is my final robotic arm, I changed the robotic claw to a hand as I decided I wanted to the arm to be more cartoony. I also felt I could give this hand more character than a claw making my arm more life like. Although it looks quite simple I think it looks quite effective and it works well. What do you think?


My chess Board Arm
I havent blogged in a while now, I have just been very busy with my up coming Context 2 assignment. I have also been learning how to rig my robotic arm, I had a few problems along the way but I can now proudly say I know how to rig an arm in 3DS Max. I had an idea of how I would like my arm to look so I did a few sketches which allowed me to develop my arm. Here a few of the sketches...


My main idea was to use a claw like the ones you would find in an arcade. I also did some research to of current robotic arms which allowed me to produce this design.
Thursday, 13 October 2011
Project 4: Context 2
For this project I have to research and write a report discussing my place in multimedia in terms of my network and companies that I identify, that can be connected to the the network and I am interested in working with.
So far I have researched nine different Animation studios and sent messages to them asking about what work they do and whether they offer work placements for students like me, fingers crossed I will get positive responses.
The report I have to write is between 2000 and 3000 words, which is a lot more than I have ever written I think, so I am going to do little by little each week to make the amount of work seem a lot smaller as essay writing isn't my strong point. Wish me luck!!!
Project 3: Still Life
My 3rd project is a Still Life project, I thought I'd never have to do Still Life again when I left school but apparently that is not the case.
The brief to this project is...
'Still life can show us new ways of seeing at ordinary objects and it is one of the major genres of Western art. Principally, the subject matter is anything that does not move or is dead. So a still life includes a small grouping of all kinds of man-made or natural objects, cut flowers, fruit, vegetables, game etc.
For this project you will need to design, model and render 4 Still life scenes using at least 6 objects that you have collected or found. Research and study various still life paintings and photographs and think about the concept you would like to convey in your scene. Consider the design elements such as the, colour, symmetry, pattern, shape, lighting, shadows and the mood with in the pictorial composition.
Set the scene, choose the location i.e. table by window and the objects then model and texture them. Next arranging the objects until you find the most pleasing composition then add a camera and lights and render the scene. Rearrange the same objects and render scenes 2, 3 & 4.'
The idea of this project is to think about texture, lighting,size, colouring as well as the layout of the objects, although this sound extremely boring to me, it will be important for future projects, including my current projects.
Project 2: Fantasy Olympic Sport
The second project I have been set is to design and make up a fantasy sport for the olympics. I have to come up with an ident for the sport as well as a 30 second animation to show how the sport works.The word 'fantasy' in the title allows me to bend the rules of reality so we can make the impossible, possible in our own 3D world e.g. zero gravity games.
The brief to this project is...
At the moment I want to do something involving Kayaks but I am not really sure how I am going to make it 'futuristic' so to speak. I have done a few sketches but I am tempted to change the sport.
This project is going to be tough and will be a serious test of my skills but again I am excited about this project I just need to find a good idea so i can let my creative ideas flow.
The brief to this project is...
'Rationale:
Branding and character design are important aspects of both animation and motion graphics,
helping to convey a mood, product or idea in a simple and engaging way. The multimedia industry is
rooted strongly in the commercial and advertising sectors and the working processes and pipelines within
producing adverts are essential to understand. This project typifies a standard request of an animator
when working with creative agencies.
Background:
After Effects is a fundamental tool within any motion graphics studio, both as a creation and post production
tool. Through looking at After Effects we shall explore and practice designing, modelling, texturing, lighting, camera
and animation techniques with a view to understanding the animation production pipeline.
In this project we will look at using it to rig and control your character, props and scenario design within After
Effect's 3D environment space, looking at the aspects needed to execute the project and the working methods that
bind it with both compositing and 3D animation software.'
At the moment I want to do something involving Kayaks but I am not really sure how I am going to make it 'futuristic' so to speak. I have done a few sketches but I am tempted to change the sport.
This project is going to be tough and will be a serious test of my skills but again I am excited about this project I just need to find a good idea so i can let my creative ideas flow.
Project 1: Self Defeating Chessboard Game
The first of the 4 projects I have been set this term is a 'Self Defeating Chessboard Game.' The brief say's this...
'Use all your creative skills and media savyness to produce at least 30 seconds of animation to demonstrate a conflicted self-defeating Chess playing machine to extreme comic effect. The Machine should evidently wish to defeat itself during the animation without narration, think hand gestures and body language. When designing and animating think about articulation, timing, camera shots, compositing Foley [sound effects], mise en scène and lighting.
Through looking at Hierarchy and control then character and prop design we shall explore and practice designing modelling, rigging, camera and animation techniques with a view to understanding the animation production pipeline. We shall look at the work of big studio and independent animation auteur’s with a view to developing an understanding of the creative and professional context of this vocation.'


I have a few ideas floating around and I have done a few sketches which I will upload shortly I just need to improve them. I am excited about this project, it should allow me to develop my skills rapidly. Andy is a good and exciting lecturer making this project a whole lot easier to do but I have to remember that the deadline isn't very far away.
Year 2 - It's good to be back!!
I have been back at university for nearly two weeks now and I have already been set 4 projects. I have chosen the Virtual Environment pathway as I concluded at the end of last year. Over the summer I played around on 3Ds Max to improve my skills and keep the software fresh in my mind although I have nothing to show for this I felt it was important to do this and has worked to my advantage for the beginning of this new year.
I look forward to what else is to come this year and I hope by the end of this year my skills have improved dramatically. I also hope that you continue to enjoy the work I produce and continue to give me feedback as it is important for me to learn where I can improve my work in all areas.
I look forward to what else is to come this year and I hope by the end of this year my skills have improved dramatically. I also hope that you continue to enjoy the work I produce and continue to give me feedback as it is important for me to learn where I can improve my work in all areas.
Thursday, 2 June 2011
Moving Image: Dog - My Edit
After completing all the three projects I have decided to go back and edit my first project, moving image. I decided that our film was simply too long and needed to be shorter by at least half the time. The main aims that I wanted to achieve were:
- To see if I could keep the storyline the same or as similar as possible to the original storyline.
- To draw the audience in.
- Remove all uneccessary scences that do not develop the plot.
Tuesday, 24 May 2011
Visual Essay - I am choosing my Pathway because...?
This is my Visual Essay which was the 2nd of my two Context 1 Assignments set for me this year at Nottingham Trent University. The aim was to show which one of these 3 pathways , Interactive Media, Virtual Environments and Moving Image I will continue next year. The media I chose to do the essay on had to correspond with my decision.
Overall I feel that I have created a strong Visual Essay that clearly states which pathway I have chosen, with some help form the 5 practitioners that I chose. I think i could of my quite a few improvements but unfortunately either my skills or resources did not allow me to do so However, I would definitely would like to improve the voiceover and maybe I will do so in the future.
I hope you enjoy it and I would appreciate any feedback you may have.
Sunday, 22 May 2011
Visual Essay: With Sound...but does it need to be edited?
Below is another version of my Visual Essay, I have added the voice overs but I still have some more sound to add. I am not too happy with the voice overs so i think I am going to have to re do some of them again. However, as you can see the essay is going well so far but I still have many improvements to make. I would be grateful for any feedback or changes that you think I could make.
Saturday, 21 May 2011
Visual Essay: Animation With Some Sound
Below is the final render of the animation I will be using for my Visual Essay with some sound. I have added the voiceovers, at the moment I am not happy with them, I don't know whether it is because I don't like hearing my own voice played back to me or the quality of the recording. I think that I am going to re-record some of the voiceovers that I am unhappy with, any other feedback anybody may have, just comment I would be very grateful.
Visual Essay Trial
Here is my fist trial render, although i haven't added lighting, sounds, textures, images and text, I just wanted to see what I had done so far so I know where to go next with the essay. As you can see it is coming together but still needs a lot of work doing to it.
Tuesday, 10 May 2011
Visual Essay: Update
Over the last few days, I have a great deal of time designing and preparing my Visual Essay; I have made considerable progress and am pleased with the work I have completed so far. I have designed every inanimate object that I will be using and I have started animating the camera. Furthermore, I have also started to collect a number of images that I will be using; however, I am still unsure whether I want to use a voice over or use text to portray the context of the essay? To conclude, I now have to complete the animating of all final objects, camera movement and add the materials. I will then have to render the animation which I think will take about a day. Finally, I will add all the images and text and/or voiceover using Adobe Premiere Pro. Below are a few images that I wish to share with you of my animation so far.


Three doors which represent the three pathways, after entering the two I do not want to continue they are boarded up.

Virtual Environments (My Bedroom)

Virtual Environments (My Bedroom)

Virtual Environments (My Bedroom)

Virtual Environments (My Bedroom)

Interactive Media

Interactive Media

Moving Image

Moving Image

Moving Image

Moving Image

Moving Image

Moving Image
Friday, 6 May 2011
Animation: Completed Haunted Ride
This is the final version with sound of my Haunted Ride.
My final project of the year was in Virtual Environment’s; the brief was to design and build a haunted ride with at least 3 scare scenes and suitable to fit within the Waverly Theatre. Initially, this project seemed daunting to me as I did not feel that I had enough understanding of the software (3DS Max) to be able to create a ride that would be effective as well as scary. However, after acquiring inspiration from the moodboard I produced and also sketching possible designs ideas, I began to gain confidence in my ability to utilise the software successfully and build an interesting haunted ride.
I intended to maintain the suggested them of a haunted mansion and graveyard. I began by drawing up designs of coffins, gravestones, a mansion, falling skeletons, swinging blades and a variety of cart ideas. I soon realised that my designs were far too complex and intricate for the limited skills that I have; however, I did not let this prevent me from attempting to create these designs. I started searching online for tutorials that would allow me to fulfil my visual ideas and I slowly began to piece together my ride. I found ‘trial and error’ played a large part in the project; many features I would liked to have included, such as rain, I simply did not have the knowledge to execute. Features that I did manage to include were fog, flames for the candles and flashing lights for lightening. I feel that I have progressed significantly since the beginning of the year and the ‘TV Ident’ project.
Overall, I am pleased with what I have achieved as I feel that I created 3 ‘scare scenes’ that are good quality, and also incorporate numerous textures to give my haunted ride a realistic atmosphere. The fog gives is intended as pathetic fallacy and to help enhance a cold and spooky experience; moreover, it aids to blur the audiences vision so you they do not know where the next scare is going to come from. I am also satisfied with my cart design, as I believe the idea of using a coffin was unique and adds a sense of terror. I included my logo from Interactive Media as I felt that the name worked lucratively with the ride; the colours were adapted to fit with the theme.
I had number of issues with rendering and the length of time this process took, however, I persisted and I believe I finally had a render that I could be proud of. I found adding sound using Adobe Premiere Pro relatively undemanding and I feel that the sounds enrich the ride by appealing to the audiences senses.
I have learnt a vast amount whilst completing this project. This has led me to confirm my decision to continue Virtual Environments next year and therefore to create a ‘Visual Essay’ based upon this pathway. I am now very excited and look forward to the next two years studying Virtual Environments.
Animation: Haunted Ride Final without audio
Below is the final render of my animation, I have taken into account most of the feedback I have received and made some changes. I have also included the logo that I used for my Interactive Media project and edited it to fit the theme for this animation. Hopefully you will agree with me that this version of the animation is a vast improvement from the first. Now all I have to do is add some sound, which I will post in my next blog.


Thursday, 5 May 2011
Visual Essay: Storyboard
After writing up my plan for my Visual Essay I felt that it was important to draw up a storyboard so that I can get the image that I have in my head, down on to paper. They are only quick sketches and show very little detail but I feel that they show my vision and they will help me to stay organised as I work. I hope they give you an in sight into my idea and fingers crossed it will all come together nicely.


Wednesday, 4 May 2011
Animation: 2nd Haunted Ride Test Render
The feedback I have received has led me to make some changes; I have increased the density of the fog and slowed the flickering lights as they were flashing too fast for the audience to identify exactly movements and events. I have also received positive feedback about the scenery and the number of scares that I have included. Below is the updated version, however I still feel improvements can be made as I still intend to add the effects of thunder and lightening.
Animation: Haunted Ride Test Animation
I have completed a test render to see the effects of my animation so far; this will allow me to make amends to any problems that may be occurring. Below is the rendered animation, I would appreciate any feedback that anybody can give me so that I can improve my ride.
Animation: Haunted Ride Rendered Images
Below are four images of the rendered objects I have designed as well as adding materials to each object. I have tried my best to make each object look as realistic as possible by assigning the correct material.

The Cart.

Part of the Entrance.
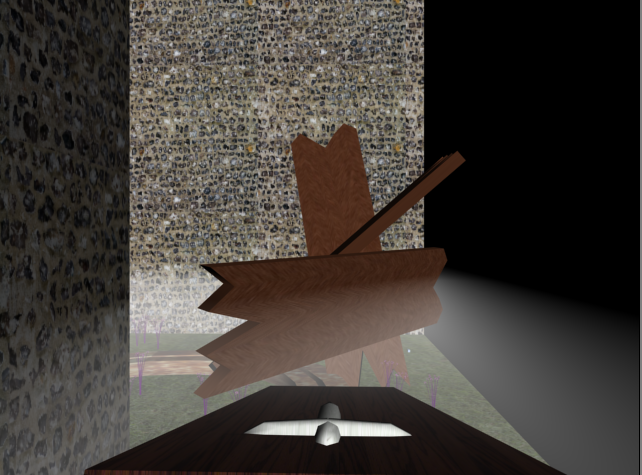
The wooden planks after being pushed out of the way.

This Blade
Animation: Haunted Ride
For my animation, I have decided to create a haunted graveyard where the audience will come across a number of scares, such as a falling trees, blocked pathways, jumping zombies, falling blades and flashing lights. Some of the main objects included in the animation will be coffins and gravestones. Below are a few screenshots that I have taken whilst producing my Haunted Ride animation, these images are without any materials added.

This is a screenshot of 3Ds Max as I see it when designing my animation.

This is the cart I have designed, it is a coffin that I have adapted to look like a cart, I plan to add a wooden material to it.

Above is the blade that moves up and down quickly up and down. I plan to add a bloody material to it.


The above two images are a few of the gravestones I plan to place into my animation, each will have its own material, for example, marble, stone and wood.
Subscribe to:
Posts (Atom)